Introduction
QuestDB is a high-performance, open-source time-series database designed for real-time data ingestion and querying. Built on Java, it offers SQL-like syntax for easy interaction and boasts impressive speed, making it ideal for handling large datasets. QuestDB is inspired by traditional relational databases but optimized for time-series data.
In this guide, you will install QuestDB on Ubuntu 24.04.
Prerequisites
Before you begin, ensure you have the following:
- An Ubuntu 24.04 server. We recommend a Digital Ocean VPS server.
- A non-root user with sudo privileges.
Install QuestDB
Begin by updating your server's package information index. Then, install the Java Runtime Environment (JRE) and set the JAVA_HOME variable. After that, download and extract QuestDB, move its files to the /opt/questdb directory, and finally, start QuestDB.
-
SSH to your server and update the package information index.
CONSOLE$ sudo apt update -
Install the Java Runtime Environment (JRE) on your server. QuestDB requires Java to run.
CONSOLE$ sudo apt install -y default-jre -
Set the
JAVA_HOMEenvironment variable.CONSOLE$ export JAVA_HOME=$(dirname $(dirname $(readlink -f $(which java)))) -
Visit the QuestDB GitHub releases page to find the latest release. Then, download the QuestDB tar.gz file using the following command. Replace
8.2.1with the latest version number.CONSOLE$ wget https://github.com/questdb/questdb/releases/download/8.2.1/questdb-8.2.1-no-jre-bin.tar.gz -
Extract the downloaded file. For instance,
questdb-8.2.1-no-jre-bin.tar.gz.CONSOLE$ tar -xzf questdb-8.2.1-no-jre-bin.tar.gz -
Move the new files to the
/opt/questdbdirectory.CONSOLE$ sudo mv questdb-8.2.1-no-jre-bin /opt/questdb -
Navigate to the
/opt/questdbdirectory.CONSOLE$ cd /opt/questdb -
Start QuestDB using the
questdb.shscript.CONSOLE$ ./questdb.sh startOutput:
JAVA: /usr/lib/jvm/java-21-openjdk-amd64/bin/java

     ___                  _   ____  ____
    / _ \ _   _  ___  ___| |_|  _ \| __ )
   | | | | | | |/ _ \/ __| __| | | |  _ \
   | |_| | |_| |  __/\__ \ |_| |_| | |_) |
    \__\_\\__,_|\___||___/\__|____/|____/
                        www.questdb.io

    Web Console URL                 ILP Client Connection String

    http://192.168.0.1:9000         http::addr=192.168.0.1:9000;
    http://127.0.0.1:9000           http::addr=127.0.0.1:9000;

QuestDB configuration files are in /root/.questdb/conf
Allow QuestDB Through the Firewall
To allow access to QuestDB on Ubuntu 24, you must open specific firewall ports: port 9000 for the HTTP interface, port 8812 for the PostgreSQL wire protocol, and port 9009 for the InfluxDB line protocol. Use UFW commands to allow these ports and reload the firewall to apply changes. This ensures external clients can communicate effectively with your QuestDB instance.
-
Allow port
9000through the firewall.CONSOLE$ sudo ufw allow 9000 -
Allow port
8812through the firewall.CONSOLE$ sudo ufw allow 8812 -
Allow port
9009through the firewall.CONSOLE$ sudo ufw allow 9009 -
Reload the changes.
CONSOLE$ sudo ufw reload
Understand QuestDB Directory Structure
Error and log files are crucial for managing and maintaining QuestDB. Error logs document issues such as connection problems and query failures, enabling quick identification and resolution of problems. QuestDB stores its configuration, error, and log files in the following directories:
- Configuration files:
/your-username/.questdb/conf - Logs:
/your-username/.questdb/log - Database tables:
/your-username/.questdb/db
Create and Manage QuestDB Databases
Create a database, a sample table, insert records, and query the database to ensure the installation works as expected.
-
Open the QuestDB Web Console by navigating to the following URL in your web browser.
http://<your-server-ip>:9000 -
Enter the following command under SQL to create a new
productstable. Then, click Run.SQLSample interface:CREATE TABLE products ( product_id INT, product_name STRING, price DOUBLE );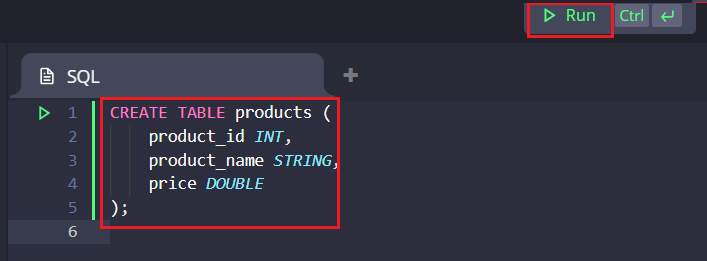
-
Clear the previous commands from the SQL textbox and enter the following commands to insert records into the table. Then, click Run.
SQLINSERT INTO products (product_id, product_name, price) VALUES (1, 'Laptop', 999.99), (2, 'Smartphone', 599.99), (3, 'Headphones', 199.99); -
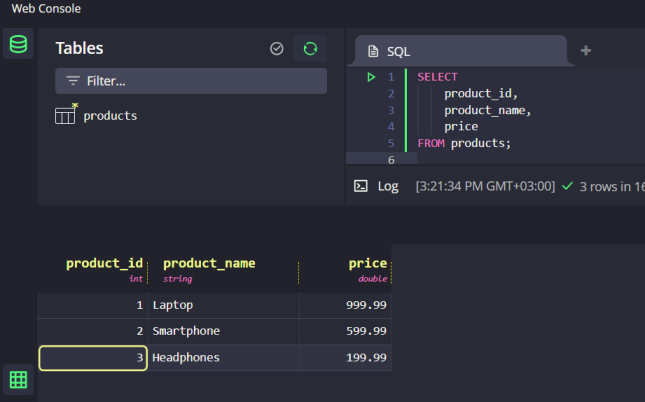
Clear the previous insert commands and run the following query to retrieve the records. Then, click Run.
SQLSELECT product_id, product_name, price FROM products;Output:
Conclusion
This guide demonstrates how to install QuestDB on Ubuntu 24.04. With QuestDB up and running, you can manage and analyze your time-series data efficiently, unlocking the full potential of your datasets. Dive into the rich features QuestDB offers to handle real-time data ingestion and complex queries seamlessly.