Introduction
phpMyAdmin is a free web-based software that helps manage MySQL and MariaDB databases. It provides a user-friendly web interface, so you don't have to use complex command-line tools. This makes it easier for users to handle tasks like creating, modifying, or deleting databases, tables, and records.
This guide shows you how to install phpMyAdmin On Ubuntu 24.04 with LAMP stack.
Prerequisites
Before you begin, ensure you've:
- Deploy Ubuntu 24.04. We recommend a Digital Ocean VPS server.
- Install LAMP stack. Follow our guide on How to Install LAMP stack on Ubuntu 24.04.
- Create a non-root user with
sudoprivileges. See our guide on How to Create a Non-Root Sudo User on Ubuntu 24.04.
Prepare User Accounts for phpMyAdmin
In this section, you'll prepare database users for phpMyAdmin, set up a sample database, and assign the necessary privileges using the MySQL command line interface.
-
SSH to your Ubuntu 24.04 server and update your system's package information index.
CONSOLE$ sudo apt update -
Log in to your MySQL database server as
root. If you've installed a fresh copy of MySQL on Ubuntu 24, therootpassword is usually blank.CONSOLE$ sudo mysql -u root -p -
Create
phpmyadmin'@'localhostuser account. phpMyAdmin uses this account to perform necessary operations and maintain its configuration, often with limited privileges to ensure security. This dedicated account helps segregate application-specific tasks from other user operations. Replaceyour_secure_passwordwith a strong password.MySQLmysql> CREATE USER 'phpmyadmin'@'localhost' IDENTIFIED BY 'your_secure_password'; GRANT ALL PRIVILEGES ON phpmyadmin.* TO 'phpmyadmin'@'localhost' WITH GRANT OPTION;Note:
The above step is mandatory if you want to install phpMyAdmin On Ubuntu 24.04. Otherwise, you'll get an error that says:
Your password does not satisfy the current policy requirementsThe above error occurs due to a bug in MySQL if you've installed the MySQL
validate_passwordplugin. Even if you supply a password that meets the password policy, MySQL will still display the error. Another workaround is to uninstall the validate_password plugin temporary before installing phpMyAdmin and then install it back.MySQLmysql> UNINSTALL PLUGIN validate_password; -
Create a test
e_commercedatabase. You'll access this database with a user account to ensure phpMyAdmin works as expected.MySQLmysql> CREATE DATABASE e_commerce; -
Create a user account for accessing the
e_commercedatabase. Replaceyour_secure_passwordwith a strong password. Then assign the user full privileges to thee_commercedatabase.MySQLmysql> CREATE USER 'e_commerce_user'@'localhost' IDENTIFIED BY 'your_secure_password'; GRANT ALL PRIVILEGES ON e_commerce.* TO 'e_commerce_user'@'localhost' WITH GRANT OPTION;Note:
While it's practically possible to create a MySQL user account that uses the phpMyAdmin interface to access all databases, it's highly discouraged for security reasons.
This practice increases the risk of accidental deletions, data leaks, and potential security breaches.
Instead, always adhere to the principle of least privilege to maintain a secure and well-managed database environment.
-
Log out from the MySQL server.
MySQLmysql> EXIT;
Install phpMyadmin
PhpMyadmin is maintained in the Ubuntu repositories. Follow the steps below to install the package using the APT command.
-
Install the
phpMyadminpackage.CONSOLE$ sudo apt install phpmyadmin -y -
Select
[ ] apache2as the default web server for running phpMyadmin by pressing Tab + Enter. - Press Enter to select Yes configure database for phpmyadmin with dbconfig-common.
- Enter the password you created for
'phpmyadmin'@'localhost'user account and press Tab, then Enter. - Confirm the password on the next prompt and press Tab, then Enter.
Configure phpMyadmin with Apache
You should add a symbolic link to the /etc/apache2/conf-enabled/ directory for PhpMyadmin to work with Apache. Otherwise, if you try to access PhpMyadmin from the web browser, you will get the following error.
Not Found. The requested URL /phpMyadmin was not found on this server.
Create the symbolic link by following the steps below.
-
Run the following
lncommand.CONSOLE$ sudo ln -s /etc/phpmyadmin/apache.conf /etc/apache2/conf-available/phpmyadmin.conf -
Enable the new configuration.
CONSOLE$ sudo a2enconf phpmyadmin.conf -
Restart apache to load the new changes
CONSOLE$ sudo service apache2 reload
Open PhpMyadmin on a Web Browser
After installing PhpMyadmin, you should ensure the package is working by following the steps below.
-
Visit the following URL on a web browser such as chrome. Replace
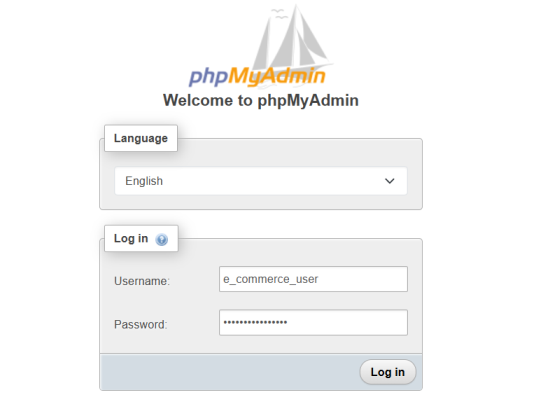
192.168.0.1with your server's public IP address.http://192.168.0.1/phpmyadminIf you installed phpMyadmin correctly, you should see a login page.
-
Enter the
e_commerce_userlogin details to access phpMyadmin.
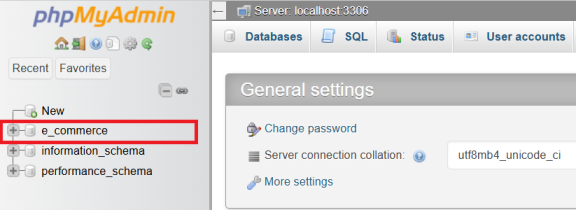
-
Manage the sample
e_commercedatabase that you set up earlier.
Troubleshoot phpMyadmin
If you encounter any errors when installing and configuring phpMyadmin, run the following commands to reconfigure phpMyadmin.
$ sudo dpkg --configure -a
Conclusion
This guide shows you how to install phpMyAdmin on your Ubuntu 24.04 server. This user-friendly interface makes managing your MySQL databases much easier. With phpMyAdmin, you can create, modify, and delete databases, tables, and manage records effortlessly. You can also run SQL queries, import and export data, all through an intuitive web interface. This powerful tool simplifies database administration tasks and enhances your overall productivity.