Introduction
PHP (Hypertext Preprocessor) is one of the most preferred and powerful general-purpose programming languages. The open-source scripting software runs millions of dynamic websites including CMS (Content Management Systems) like Wordpress and OpenCart. PHP's popularity comes from the community support that builds free production frameworks, such as Laravel.
This guide shows you how to install PHP on Ubuntu 24.04.
Prerequisites
Before you begin, ensure you've:
- Ubuntu 24.04 server. We recommend a Digital Ocean VPS server.
- A non-root user that can execute sudo commands.
- Apache webserver.
Use APT to Install PHP
PHP is maintained in the Ubuntu central repository. Follow the steps below to install PHP.
-
Update your systems package information index.
CONSOLE$ sudo apt update -
Run the following commands to install PHP. The
libapache2-mod-phpinstalls the necessary module for integrating PHP with the Apache webserver.CONSOLE$ sudo apt install php libapache2-mod-php -y
Modify Apache Default Index Files
Apache prioritizes index.html, index.cgi, and Index.pl by default when you request a page. To override this setting, edit the Apache dir.config file by following the steps below:
-
Open /etc/apache2/mods-enabled/dir.conf using
nanotext editor.CONSOLE$ sudo nano /etc/apache2/mods-enabled/dir.conf -
Ensure
index.phpis the first in the list after theDirectoryIndexdirective to giveindex.phpprecedence over other default index files.ApacheConfDirectoryIndex index.php index.html index.cgi index.pl index.xhtml index.htm -
Press Ctrl + X then Y and Enter to save the file.
Install Basic PHP Extensions
By default, a basic PHP setup doesn't install all the necessary extensions for running dynamic websites. Run the following command to install basic PHP extensions
$ sudo apt-get install libapache2-mod-php php-cli php-common php-mbstring php-gd php-intl php-xml php-mysql php-zip php-curl php-xmlrpc -y
Configure PHP INI File
-
Check the PHP version.
CONSOLE$ php -vOutput:
PHP 8.3.11 (cli) (built: Dec  2 2024 16:10:33) (NTS)
...
with Zend OPcache v8.3.11, Copyright (c), by Zend Technologies
PHP creates a default configuration file under the following directory.
/etc/php/php_version/apache2/php.ini -
Open the PHP configuration file, such as
/etc/php/8.3/apache2/php.iniusingnanotext editor to make some changes to enhance the performance of your website or web applications.CONSOLE$ sudo nano /etc/php/8.3/apache2/php.ini -
Find the following directives and change the values. Set the values according to your needs if you will be uploading files greater than
16MB.INIupload_max_filesize = 16M post_max_size = 16M -
Press Ctrl + X then Y and Enter to save the file.
-
Restart Apache to load the new changes.
CONSOLE$ sudo systemctl restart apache2
Test PHP
The next step is testing PHP to ensure it is working as expected. You'll do this by creating a test file in the var/www/html/ directory.
-
Create the
info.phpfile.CONSOLE$ sudo nano /var/www/html/info.php -
Copy the content below and paste it to the
/var/www/html/info.phpfile.PHP<?php phpinfo(); ?> -
Press Ctrl + X then Y and Enter to save the file.
-
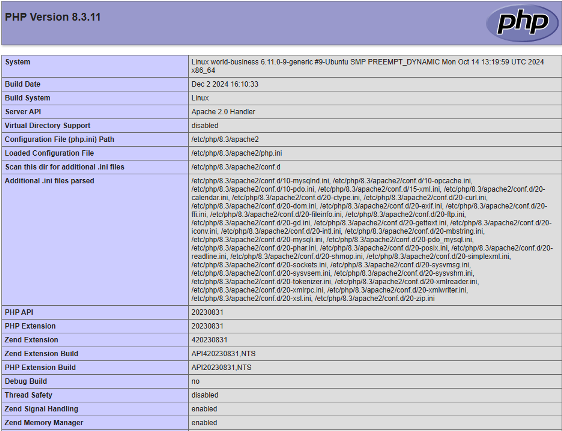
Visit the following URL on a web browser and replace
198.18.0.12with your server's public IP address.http://192.16.0.1/info.php -
Ensure your browser displays the PHP information page.

Conclusion
In this guide, you've installed PHP on Ubuntu 24.04, changed some default settings, and run a default PHP information page to test the configurations. After installing PHP, you can integrate PHP with a database server such as MySQL to run dynamic websites.