Introduction
Apache webserver dominates the market and serves millions of websites. It supports Windows and Linux, hosting both static and dynamic websites, and serves web applications built with PHP, Python, and Ruby. Apache can also function as a reverse proxy, load balancer, and handle SSL/TLS encryption. Its extensive modules and configurations provide a robust and flexible web hosting solution.
This guide shows you how to install Apache on Ubuntu 24.04.
Prerequisites
Before you begin, ensure you've:
- Ubuntu 24.04 server. We recommend a Digital Ocean VPS server.
- A non-root user with sudo privileges. Read our guide on How to Create a Non-Root Sudo User on Ubuntu 24.04
Install Apache
Apache is available on the Ubuntu software repositories. Follow the steps below to install Apache using the Ubuntu APT package manage:
-
Update your server's package information index.
CONSOLE$ sudo apt update -
Type the command below to Install Apache.
CONSOLE$ sudo apt install apache2 -y -
Allow Apache ports through the firewall
CONSOLE$ sudo ufw allow 80 $ sudo ufw allow 443Output:
Rule added Rule added (v6) -
Reload the firewall to effect the new changes.
CONSOLE$ sudo ufw reloadOutput:
Firewall reloaded -
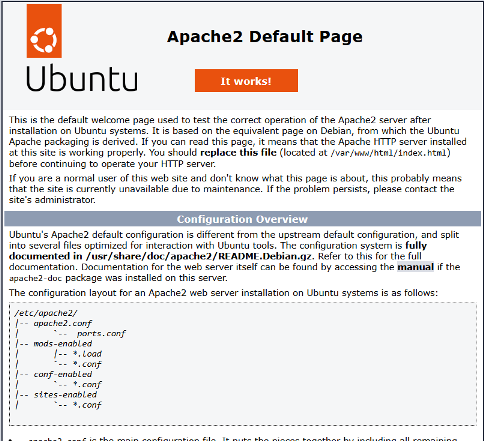
Open a web browser, such as Chrome, Mozilla or Windows Explorer, and enter your Ubuntu server's public IP address.
http://198.168.0.1 -
Ensure your browser displays the default Apache web page.

Configure Common Apache Modules
Apache allows you to run website and web applications. In most cases, you'll integrate Apache with a scripting language like PHP and a database server like MySQL. To ensure your website and applications run smoothly, enable the following common Apache modules:
Enable Apache mod_rewrite
This module allows Apache to create pretty URLs on a website. Enable mod_rewrite.
$ sudo a2enmod rewrite
Enable Apache mod_deflate
The Apache mod_deflate saves bandwidth by compressing output from your websites or web applications before sending it to browsers. Enable mod_deflate.
$ sudo a2enmod deflate
Enable Apache mod_authz_host
Mod_authz_host controls access to particular files on the webserver. Enable mod_authz_host.
$ sudo a2enmod authz_host
Enable Apache mod_headers
$ sudo a2enmod headers
Restart Apache to enable the changes above by typing the below Linux command:
$ sudo service apache2 restart
Understand Apache Configurations
You should familiarize yourself with the Apache settings and directory structure to make troubleshooting easier. Here are the most basic files and directories that configure Apache
/etc/apache2/apache2.conf: Contains global setting files for Apache./etc/apache2/conf-available: Stores all available configuration files for Apache./etc/apache2/conf-enabled: Stores symbolic links to all files in the/etc/apache2/conf-availabledirectory. When you add a symbolic link in this directory, it will be automatically loaded/enabled when Apache starts./etc/apache2/envvars: Sets Apache environment variables./etc/apache2/mods-available: Stores Apache modules and their configurations. However, some modules may not have a configuration file./etc/apache2/mods-enabled: Stores symbolic links to the files in the/etc/apache2/mods-availabledirectory. When you create a symbolic link for a module in this directory, it will be enabled when Apache starts./etc/apache2/ports.config: Contains basic settings that direct Apache on which ports to listen to./etc/apache2/sites-available: Stores all the settings for virtual hosts. Apache comes with a default virtual host named/etc/apache2/sites-available/000-default.conf. You can copy this file to create additional virtual hosts to host multiple websites on the same Apache server./etc/apache2/sites-enabled: Stores symbolic links for the/etc/apache2/sites-availabledirectory. When you create a symbolic link in this directory, the site is enabled when Apache starts./etc/apache2/magic: Contains instructions that determine the MIME type of a file.
Conclusion
You've installed Apache on Ubuntu 24.04. You started by updating your package list and then installed Apache with the APT command. You've also enabled the necessary modules and familiarized yourself with the Apache configuration directories.